


Halloween is a Great Time for Art and Craft
- Shannon de Winnaar

- Oct 29, 2021
- 2 min read
At Astor International School we engage students into fun learning activities and believe that some of them can be played at home. Check out our art and craft activity suggestions and try it out with your kids!
1. X Ray Skelton Hand
Students trace their hands, then add see-through bones to their picture, making their own X-ray skeleton hand.

Required materials:
Coloured construction paper
black crayon
Vegetable oil
A small bowl
Q-tip
Procedure:
Trace hands with black crayon.
Dab oil onto bones in traced picture using Qtip
Put picture against sunlight
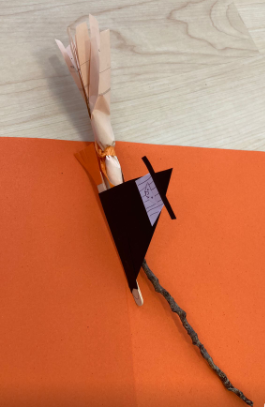
2. Witches and Brooms
Required Materials:
Orange, black and white paper
Black pen
Scissors
Glue stick
Lolli stick
Stick
Newspaper
Orange Ribbon
Procedure:
Get a stick from outside
Get some brown paper and wrap it around the end of the stick
Use orange ribbon to wrap around the brown paper
Cur the brown paper from the tip slightly to make brushes
3. Slime Sensory Bin
Procedure:
Fill a container with slime
Hide googly eyes in the slime
Use tweezers to pick out the eyes (the winner is the one who found the most eyes)

MAKE YOUR OWN SLIME
Ingredients:
Tapioca flour
Water
Food Colouring
Recipe:
Mix equal parts tapioca flour and water with several drops of food colouring. E.g., 1 cup of tapioca flour with 1 cup of water. Stir it until it is evenly mixed and then heat in the microwave for 30 seconds. Stir it up and then microwave again for 30 seconds.
4. Sand Sensory Bin

Procedure:
Fill a big contained with sand
Hide the skeleton bones inside the sand
Use a brush to brush the sand away to find the bones
Once found all the bones make the skeleton
5. Water beads Sensory Bin

Procedure:
Fill a container with water beads
Hide plastic Halloween objects inside e.g. spiders, bats, bones
Use net to fish for the Halloween objects (the objects have different points on them)
Add your points up at the end to see who is the winner
6. Witch Hat

Top of Hat
On A3 black paper – portrait view, draw half an oval from left bottom corner to right bottom corner
Cut it out and form a cone shape
Staple in place
At the bottom of the cone, in the middle, snip 1cm. Do the same on the left and right side, then fold up**
Rim of Hat
Draw a large circle on black paper
Draw an inner, smaller circle inside the large circle (there should be around 3cm distance between the two circles)
Fold the big circle in half, but only cut out around the smaller, inner circle
Place the rim around the cone of the hat. The edges of the cone you have snipped and folded up should be glued to the base of the rim (underneath the rim).
Hat Buckle
Cut a rectangle piece of purple paper (3cm wide, 2cm long)
Fold in half
Cut out a square in the center. Open up, you should have a rectangle shape missing
Stick at the front of your hat, in the center
Halloween Masks
Print out Halloween mask
Laminate
Cut around mask
Cut out eyes
Hole-punch sides
Tie a piece of string to each hole.
Use string to tie mask around head
Comments